SkyWindow guide
How to set up SkyWindow so it knows what your sky looks like, and how to get the most out of each clear night.
- 1. Add your observing spot
- 2. Align the compass
- 3. Mark the blocked directions
- 4. Plan a night
- 5. Your telescopes
- 6. Cloud forecast, best nights and alerts
- 7. Plans: finishing a target over several nights
- Troubleshooting
1. Add your observing spot
On first start SkyWindow opens the Setup guide: a checklist of the steps below, each with a button that takes you to the right screen and a tick when it is done. Open it again any time via ⋮ → Setup guide.
Tap Add my location. Use Use my current position while standing at the spot (or type the coordinates), give it a name such as "Balcony" or "Garden", and set a minimum altitude if your telescope cannot point low (many smart telescopes work best above 15–20°), and the sky brightness as a Bortle number (1 = pristine dark site, 4 = rural/suburban, 6 = bright suburb, 8–9 = city — look it up on a light-pollution map). The Bortle number is used to advise how long to image a target.
You can save several places — home, a dark-sky site, a holiday address — and switch between them with the location chip on the Tonight screen.
Location setup. Everything that belongs to a place is in its Location setup (Locations → tap the location): Position, Sky (Bortle and minimum altitude) and Compass & horizon (compass alignment, blocked directions and horizon line). A checklist at the top shows what is done — sky brightness, blocked directions & horizon, compass aligned — and tapping a missing item takes you straight to it. Setup is optional; until it is complete, the Tonight screen and the Locations list show e.g. "Setup 2/3". Open sky all around? Tap Nothing blocked here to mark it done.
2. Align the compass
The AR view and the camera check for blocked directions use the phone's compass. Phone compasses are often 5–15° off, and much more near metal. One alignment on a known object fixes this.
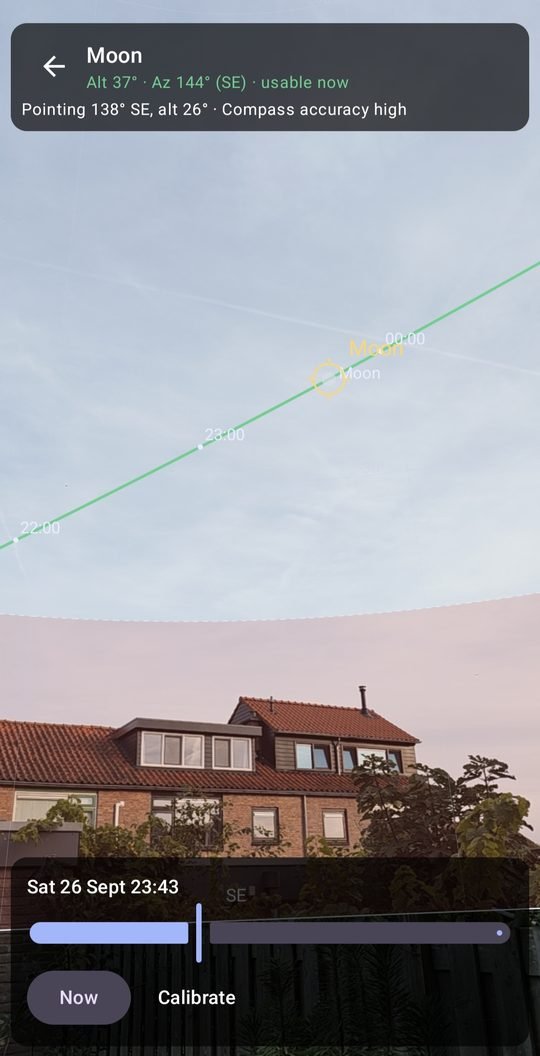
When: an evening with the Moon or a bright planet (Jupiter, Venus, Saturn) in view.
Where: at the spot you observe from, a few steps away from cars, balcony railings, radiators and speakers. Take the phone out of a case or holder with magnets.
How:
- In Location setup → Compass & horizon tap Align compass (or open the AR view and tap Calibrate). Without a chosen target it shows the Moon.
- Leave Gyro only off.
- Point the crosshair at the Moon and tap Align on Moon. The Moon marker now sits on the real Moon.
- If it is still a little left or right, use the Compass correction slider. If the grid spacing does not match the sky (e.g. the Moon's path looks too big or too small), adjust Field of view.
- Tap Done. The correction and the date of the alignment are saved on the phone.
Gyro only. Near metal the compass keeps jumping. Switch on Gyro only: the view then follows the gyroscope only and ignores the compass. Align on the Moon as above. When you leave the AR view (or switch Gyro only off), SkyWindow asks whether to keep this alignment — choose Keep to save it as the compass correction. Gyroscopes drift slowly, so re-align if the view creeps away after a few minutes.
Per location. A compass can be off by a different amount at each place (buildings, cars, steel in a balcony), so the alignment is always saved for the active location. Align once at each location; a new location starts as not aligned. With only one location everything is stored under it; when you add a second one, the first keeps its settings and the new one starts blank.
Check it later. The location's setup checklist and Settings → Compass & AR show when the compass was aligned at each location. The camera check for blocked directions warns when it was never aligned (at this location) or more than a month ago. Re-align after a system update, with a different phone case, or when the markers no longer match the sky.
3. Mark the blocked directions
Buildings, trees and hills hide part of the sky. SkyWindow only counts time when a target is in open sky.
On the sky map (Location setup → Compass & horizon): tap a direction to add a blocked sector, drag its edges or use the −/+ buttons, set how high it is blocked ("blocked below 35°" or fully blocked) and give it a name.
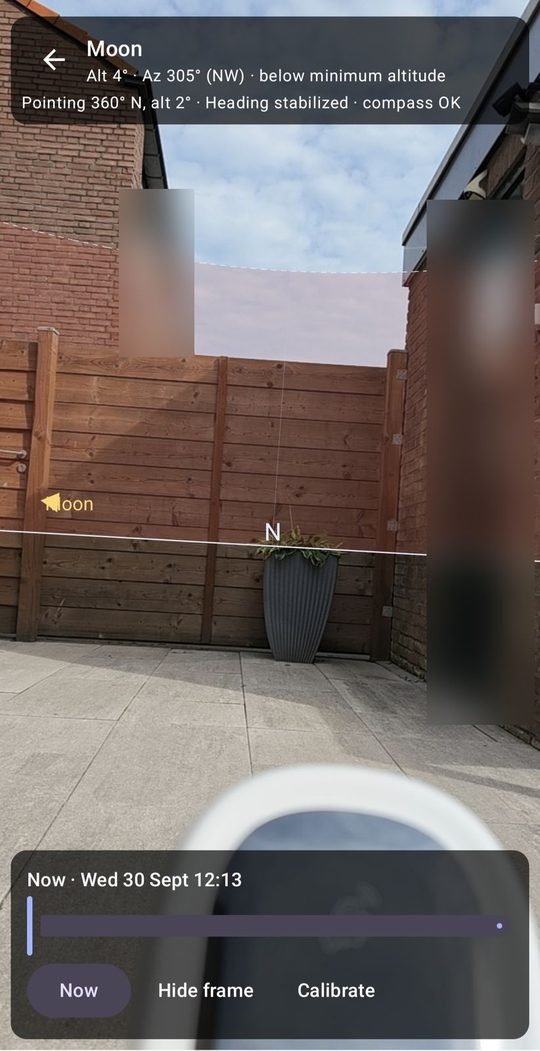
With the camera — Check & adjust with camera in Location setup. Align the compass first (step 2): the blocked sky is drawn in red over the live camera image, using the same correction as the AR view.
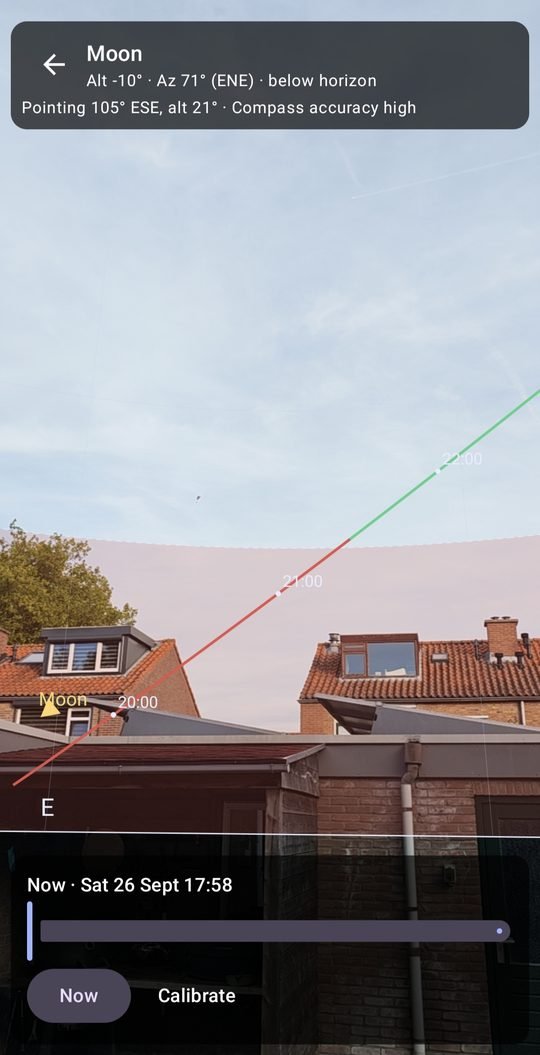
- Point the crosshair at the left edge of an obstruction and tap Set start here.
- Turn right to its right edge and tap Set end here.
- Point at the top of it and tap Set height here, or choose Fully blocked.
- Start another sector here for the next obstruction, then Done and save the location.
Horizon line (optional). Blocked directions are quick; the horizon line is exact. It follows the real skyline of roofs, trees and hills and is used on top of the blocked directions.
- Scan with camera (recommended, Location setup → Compass & horizon): align the compass first, stand where the telescope stands with the phone at telescope height (see below), keep the skyline in the middle of the screen with sky above it, tap Start scan and turn slowly once around. The circle shows where the skyline is found; the bar at the bottom fills in as you turn — grey parts are still missing. Pause and continue any time; Start over clears it. Tap Use this horizon, then save the location. Works in daylight or bright twilight; no photo is taken or saved.
- Trace by hand: for parts the scan can't find (a tree right in front of you hides the sky completely). Put the crosshair on the top edge of the roofs and trees, hold the button and sweep slowly along the skyline. Lift your finger to pause; trace a part again to correct it, or use Undo.
- Clear removes the horizon line again.
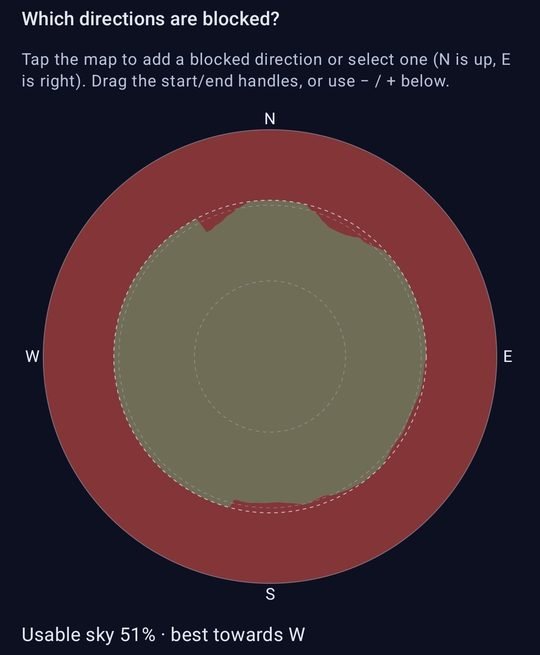
Check it at night in the AR view: the horizon line should follow the real roofs and trees. Scan a part again to correct it.
Use it on your computer. Export horizon… (under the horizon buttons) shares the horizon line and the blocked directions together, through the share menu (e-mail, Drive, …). The minimum altitude is left out.
- N.I.N.A. (.hrz): in N.I.N.A., Options → General → Astrometry → Horizon file, pick the file. The horizon then shows in the target altitude charts, and the "above horizon" sequence conditions use it.
- Stellarium landscape (.zip): in Stellarium, Sky and viewing options (F4) → Landscape → Add/remove landscapes → Install a new landscape from a ZIP archive. It is called "SkyWindow" plus the location name; remove the old one first when you export again.
Import horizon… reads a horizon you already made on the computer: a N.I.N.A. or APT horizon file (.hrz or .txt with azimuth and altitude per line), a MountWizzard4 file (.hpts) or a Stellarium landscape with a horizon line (.zip). It replaces the horizon line of this location (the blocked directions stay); save the location to keep it. Parts the file does not cover are filled in the way N.I.N.A. does it.
Hold the phone at telescope height
The scan measures the angle of roofs, trees and fences as seen from the phone. Your telescope sits at its own height — a Seestar on a short tripod is often only 30–60 cm above the ground. If the phone is higher than the telescope, nearby obstructions look lower than they really are for the telescope, and SkyWindow will think a target is visible while the telescope is actually looking at the fence.
Hold the phone at the height of the telescope's lens, standing where the telescope stands. If you can't, go lower rather than higher: a slightly too high horizon costs a few minutes, a too low one costs a whole session.
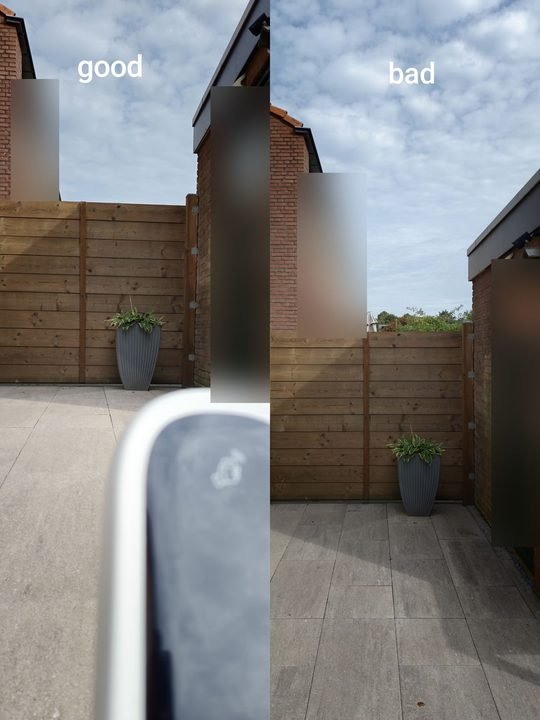
The error depends on the height difference and on how far away the obstruction is. For a phone at eye height (1.6 m) and a telescope at 0.3 m (difference 1.3 m):
| Obstruction | Distance | Error |
|---|---|---|
| Fence, hedge, balcony railing | 5 m | about 14° too low |
| House | 20 m | about 4° too low |
| Trees | 50 m | about 1.5° too low |
| Distant trees, hills, buildings | 200 m or more | less than 0.4° |
So it matters most in small gardens and on balconies, where the closest obstructions are only a few metres away. For an open field with distant trees it hardly matters.
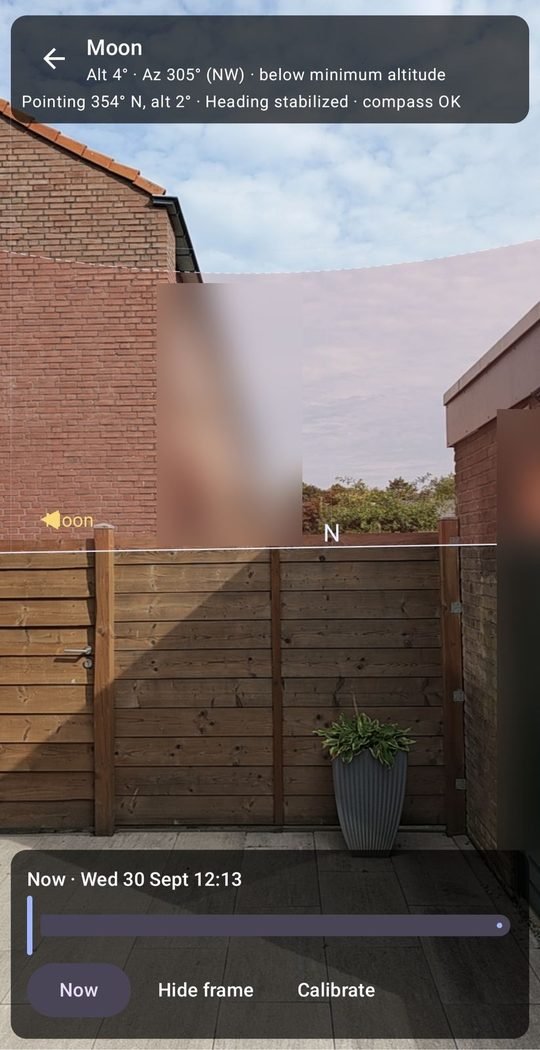
Directions are stored as true compass directions (0° = north). Re-aligning the compass later does not move sectors you already saved — if you set them while the compass was off, check them again with the camera.
4. Plan a night
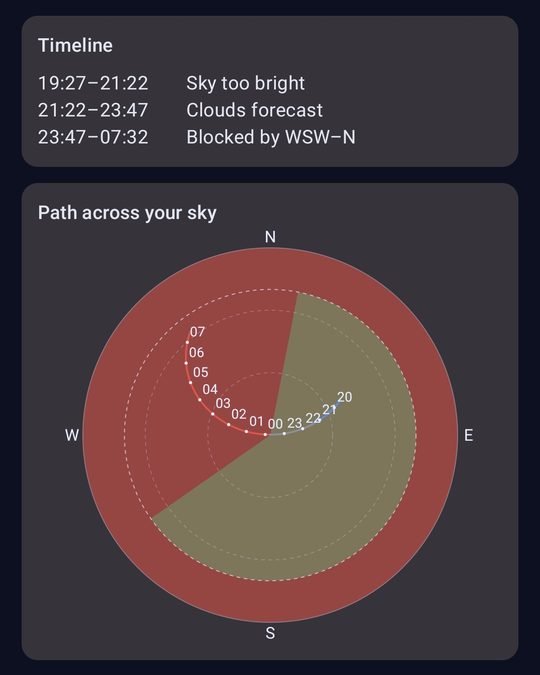
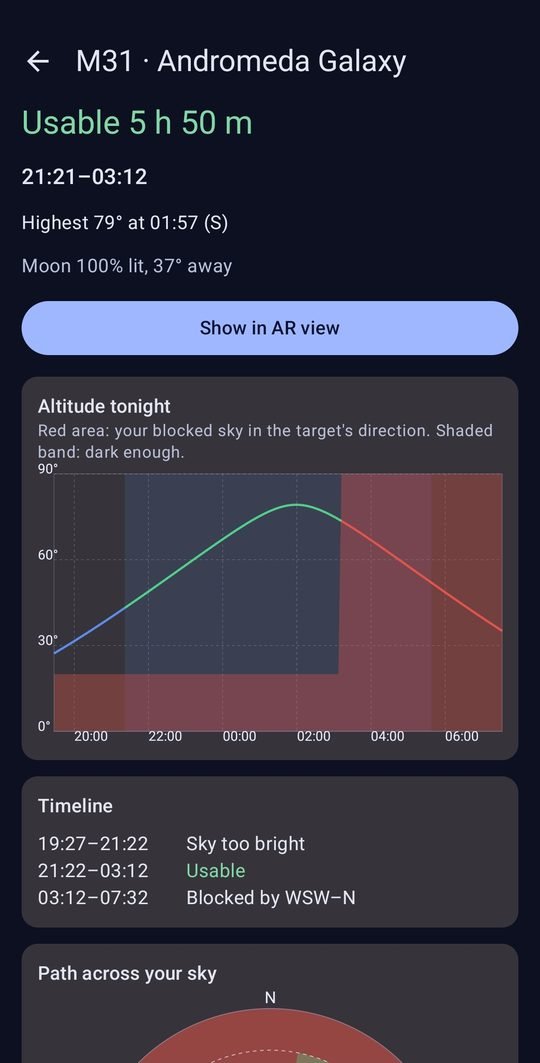
The Tonight list shows every target with the time it is really usable from your spot: dark enough, above your minimum altitude and not behind a blocked direction. Open a target for its altitude chart, the path on the sky map and a timeline of why it is (not) visible. Compare locations shows which of your places is best for it. Use the date chip to plan another night.
5. Your telescopes
Settings → My telescopes → Add telescope. Start from a Seestar or DWARF model or enter a custom setup (aperture, focal length, sensor size in pixels, pixel size). Choose alt-az or EQ mode. The object page then shows how the target fits the frame — in alt-az mode the field slowly rotates during the night — and Best tonight ranks targets for the active telescope. Switch telescopes with the chip on the Tonight screen.
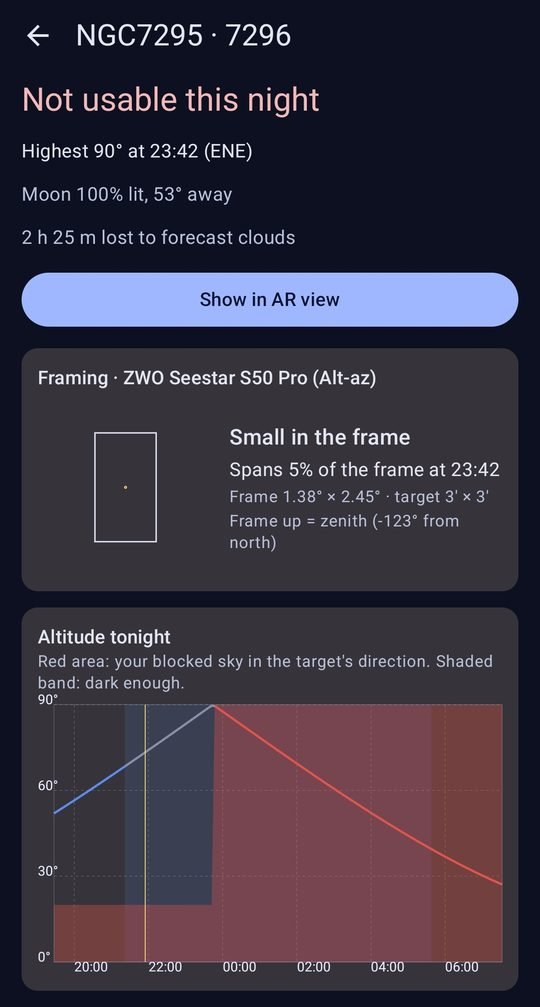
In the AR view the active telescope's frame is drawn around the target at its real size and angle — upright towards the zenith in alt-az mode, turned to celestial north in EQ mode — so you see how the target will sit in the frame before you set up. Hide frame turns it off.
LP filter. Seestars and the DWARF 3 have a built-in dual-band / light-pollution filter (for a custom telescope, switch on Dual-band / light-pollution filter). The target page and the plan then say whether to use it: on for emission nebulae, planetary nebulae and supernova remnants (they glow in Hα and OIII; the filter cuts light pollution and moonlight), off for galaxies, star clusters, reflection and dark nebulae (their light spans all colours, so the filter would block most of it). Best tonight and Plans mark targets with "LP filter".
6. Cloud forecast, best nights and alerts
Cloud forecast (Settings, off by default; while it is off, the Tonight screen shows a card with Turn on): hourly cloud cover, dew and wind from Open-Meteo for the next 8 days. Cloudy hours no longer count as usable. Only rounded coordinates (about 1 km) are sent. When a night has clear spells but also rain, snow or thunderstorms (at least 0.2 mm or a 50% chance in an hour) or stormy wind (gusts of 50 km/h or more) in the forecast, a ⚠ warning shows when to expect it, so you can cover or secure the telescope, or pack up in time. Tap Details › next to the clear times for the night hour by hour: cloud cover per layer (low cloud blocks most), chance and amount of rain, wind and gusts, temperature and dew point. Each hour is marked: ✓ good (green: low and mid cloud at most 20%, high cloud at most 5%, no strong gusts), ◐ thin high cloud (amber: high cloud below 30%), ☁ cloudy (grey, dimmed), ☂ rain (blue), ❄ snow and ⚠ thunderstorm or hail (orange, bold). The night bar uses the same colours. In red mode the symbols and the brightness keep them apart. Weather values are metric by default; choose Imperial (mph, °F, in) under Settings → Weather units.
Nights (chip on the Tonight screen): the next 7 nights rated on dark hours, the Moon and — with the forecast on — clear hours; tap a night to open it.
Clear-night alerts (Settings, off by default, needs the forecast): once a day at the time you choose, the phone checks the locations you tick and notifies you when tonight has at least the dark, clear time you set, with the best targets for your telescope. Everything runs on the phone.
Rain and storm alerts (Settings, off by default, needs the forecast): a notification 30 minutes to 3 hours (your choice) before rain, snow, thunderstorms or stormy wind start tonight at the active location, so you can cover or bring in your telescope in time. Optionally only on nights that would also get a clear-night alert. You can also turn them on with Warn me before it starts under tonight's rain warning on the Tonight screen.
Widget "Tonight's best": long-press the home screen → Widgets → SkyWindow (or use the button in the Setup guide). It shows tonight's dark hours, clear sky, the Moon and the best targets for the active location and telescope, and updates when you use the app and every few hours in the background. Make it taller to see the night chart: the clear sky from sunset to sunrise (green line, high = clear), the dark hours shaded and the Moon's altitude dotted. After darkness ends it moves on to the coming night.
Example image: on a target's page, Show example image loads a sky-survey picture of the target (Pan-STARRS, or DSS2 for large nebulae and the far south) with your telescope's frame — or the mosaic panels — drawn on it, north up. Tap it to see it full screen (pinch to zoom, double-tap to reset). It is under 1 MB and kept on the phone. In Settings → Example images you can let it load automatically on Wi-Fi only, or always.
7. Plans: finishing a target over several nights
Deep-sky images get better with more hours. Plans (chip on the Tonight screen, or the ⋮ menu) keeps a list of targets you are working on and spreads the capture time over the next 14 nights.
- Add target (or Add to plan on a target's page). Targets that are already in a plan show their progress, e.g. "In plan · 45%". Fits frame shows only targets that fit in one frame of your active telescope with 3% spare room on every side (with more than one telescope, the chip names it).
- Choose the telescope. SkyWindow advises how many hours to aim for (and the minimum), based on how bright the target is, your telescope (focal ratio and pixel size), the location's Bortle number and whether you have a dual-band filter for emission nebulae. It is tuned to what smart-telescope users find a good result from a suburban (Bortle 6) sky; a darker sky needs a bit less, a brighter one a bit more. It is a rule of thumb.
- If the target is larger than your frame, a mosaic is suggested (e.g. 2×1). A mosaic takes that many times longer; switch it off to frame the core only.
- Pick the frame length (10 s, 20 s, 30 s, 1 min …) and, if your telescope supports it, EQ mode. In alt-az mode, frames longer than 30 s trail at the edges because the field rotates; EQ mode avoids that. In alt-az mode the plan leaves out the time a target is above 80°: alt-az mounts can't track well near the zenith. The target page warns about this too.
- The goal (usable hours) is filled in with the advised time; change it if you like. The rejected frames % (default 3%: frames you expect to throw away because of clouds, satellites or wind) goes up a little for longer frames in alt-az mode. SkyWindow works out how much to capture and how many frames that is.
- The plan puts each target only inside its own usable window — dark, above your horizon and blocked directions, clear when there is a forecast — and one target at a time. Galaxies are kept out of bright moonlight. Tonight's plan shows the timeline for tonight; each project lists its planned nights. Free time: Tonight's plan also lists the dark (and, with a forecast, clear) time that nothing uses, e.g. "22:00–00:30 free (clear)"; the Tonight screen shows it too ("Free tonight", with Not tonight to hide it). Find a target — or Plans → ⋮ → Find a target for a time slot for a slot you choose: a start and an end time, or a start and how long — lists the targets by how much of the slot they are usable (e.g. "2 h 20 of 2 h 30 (93%)"), your own plans first, with Fits frame for your telescope. Each target shows the Moon during the slot; with a bright Moon up, moon-sensitive targets (galaxies, clusters, and nebulae without a dual-band filter) move down. Shoot in this slot books exactly that slot in the plan (and makes a plan for the target if it has none); the rest of the plan goes around it. A target's page lists its booked slots, each with Remove.
- Session reminders (Settings, off by default): during the night SkyWindow tells you when to start, when to switch to the next target and why the current one ends, and when tonight's plan is done. Choose how many minutes ahead, and set quiet hours so nothing arrives while you sleep. The reminders are set from the plan when you open the app on the day. Sound picks the notification sound from your phone (or silent); clear-night alerts have their own sound setting.
- Share and import: Plans → ⋮ → Share plan sends your targets (goals, mosaic, frame length, EQ mode) as a message with an import code. Your nickname, telescopes, locations and progress are only included when you switch them on — the defaults come from My profile (Settings → My profile), and each share can change them. The other person shares that message to SkyWindow, or pastes it under Import plan. After you add capture time, SkyWindow offers to share again when your last share included progress: Share, Not now (asks after your next progress) or Don't ask again (switch it back on in My profile). With a plan file that includes progress it doesn't ask: the file is updated automatically. Plan file (a link that stays the same): in Share plan, tap Save as plan file and pick a place, e.g. a Google Drive folder. SkyWindow keeps that one file up to date whenever your plans or progress change, so its link never changes. In Drive, set the file to Anyone with the link once (Share → General access) and send that link to your friends. Plans → ⋮ shows the file, Update plan file now and Stop updating plan file. (Sharing the message into Drive again from the share menu makes a new copy with a new link, so use the plan file instead.) From a link: paste the link to someone's plan file under Import plan; with Update automatically SkyWindow re-reads it when you open the app. The file must be shared publicly. A private file can still be imported once: in the Drive app open the file → ⋮ → Send a copy → SkyWindow (no automatic updates then). Imported plans appear under Shared with you: not scheduled, with who shared them and their progress. Make it my plan copies a target into your own plans. When your friend shares again, import the new message to update their progress. Export targets makes a CSV target list for N.I.N.A., ASIAIR, KStars and other programs that read Telescopius lists.
- After a session, Add capture time: hours and minutes captured (before rejects) and that session's rejected frames % (it starts at the plan's %; change it when the night went better or worse). Progress goes up and the rest of the plan moves on. Tap a session in the list to change or delete it. Reset to 0% clears the logged time to shoot the target again.
Troubleshooting
| Problem | What to do |
|---|---|
| "Compass unreliable" | Move the phone in a figure-8 a few times, away from metal. |
| "Magnetic disturbance" warning | Step away from cars, railings, radiators and speakers, or use Gyro only and align. |
| Markers are left/right of the real object | Align again (step 2). The alignment is per location: check that the right location is active. |
| Markers are too high/low or the path looks too big | Adjust Field of view in Calibrate. |
| The view slowly drifts in Gyro only | Normal for gyroscopes — align again, or switch Gyro only off when the compass is OK. |
| Blocked sectors seem shifted | They were set while the compass was off: align first, then check them with the camera. |
| Scanned horizon is too low near the telescope | Scan again with the phone at telescope height. Parts the scan misses: Trace by hand. |
| Widget shows "Outdated" | Open SkyWindow once; Android may delay background updates to save battery. |
| No cloud forecast | Check the internet connection and use ⋮ → Refresh forecast. |
| No clear-night alerts | Allow notifications for SkyWindow, keep the cloud forecast on and tick at least one location. |
Questions or ideas? Join the tester group.